How Do I Find Time for This?

I’m so sorry that I’ve been MIA here the past few days.

But here’s an explanation. And a cry for help.

I’m a busy girl–between teaching and working at the library, I work 6 days a week. And sometimes, when I’m schedule the occasional Sunday at the library, I work 13 days in a row without a day off. And teaching is a full time job that requires me to spend a lot of time outside of the classroom working on things. I’m constantly trying to figure out how I can improve things for my students, as well as grading papers, making study guides, and reviewing lesson plans. Plus, I try to have some kind of social life (which is not easy….). So something has to get to neglected. Lately, it’s been my house (dear God, does it need to be cleaned). And now, this blog….which is sad because I haven’t even really started it yet.

I really want to focus on this blog. I want to put in more time to it, develop it, and see it grow. I’ve started blogs before and have gotten discouraged because they don’t take off right away….and I get busy with other things, so I let the blog go. I know it’s going to take time to grow the blog, my brand, and my eventual business. Patience is not my strong point, but I really want this, so I’m willing to learn some patience and do what I need to in order to reach my goals. It’s just really hard when I have so many other things that require my time as well.

I’m sure I’m not the only one who is ridiculously busy with things other than their blog. In fact, I know I’m not. The blogs I read–I’m amazed by how these women can balance all of their other responsibilities and still have time to regularly maintain their blog. I am in awe of these people, and I hope I can learn to be like them.

So now I ask you–how do you manage your time? How do you keep up with your blog in the midst of all of your other responsibilities? And those of you that are running businesses, how do you find time to manage that with everything else you have to do (including building your brand via social media)? Leave your thoughts, ideas, and solutions in the comments. I look forward to reading them and seeing what you do–and hopefully getting ideas for myself.

27f6e2d6946779f49021ec3efd682d89

Your Georgia Peach,

-Amanda

Shabby Chic Picture Frame Tutorial

Well hello there! I hope you’re staying warm this morning. I’m trying, but it’s so cold (6 degrees…..unnatural), and my furnace is not able to keep up too well. I knew there was a reason I keep buying blankets. They’re coming in handy right now. πŸ˜‰

Anyway, I am finally getting you the promised picture frame tutorial. Once again, I am so sorry that it took me this long to get it to you. I will try my hardest not to let it happen again. So without further ado, I present to you, the Shabby Chic Picture Frame!

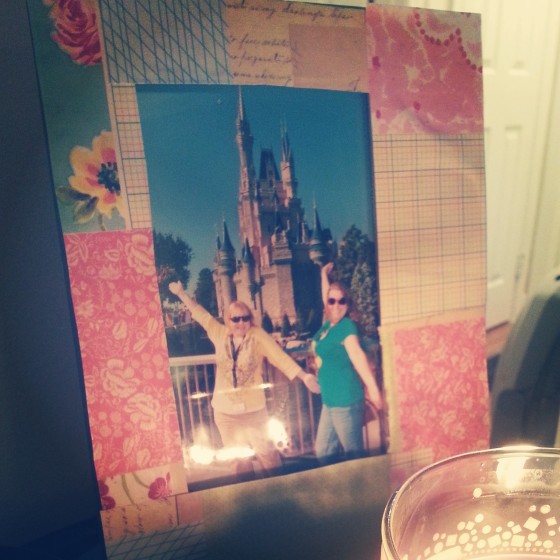
IMG_20140101_200858[1]

Doesn’t it look so nice with the candlelight there? I have an obsession with candles, and I will put them anywhere I can find a place. Just a forewarning–you’re liable to see candles in with future projects as well.

Okay, so you want to make one of these adorable picture frames, too? Well, the first thing you have to do is gather your supplies.

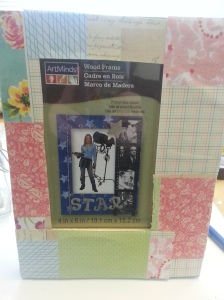
20131229_133540[1]

You’re going to need:

  • A picture frame (for this project, the wider the edges, the better). It doesn’t have to be a wooden one, but that’s what I went with. I got this one from Michaels for less than $2.
  • Scrapbooking paper. Any design/colors/pattern you want. I love the colors in this one, and the patchwork like design. It goes beautifully in my living room.
  • Sissors and/or an Exacto knife to cut the paper with
  • Mod Podge. What you see pictured is the sampler pack of Mod Podge that I picked up from Michaels. For this project, I used the matte formula. If you want a shinier finish, use the gloss formula.
  • A paintbrush to apply the Mod Podge with.
  • Paint and another paintbrush (optional), if you want to paint the edges of the frame.

Alright, now that you have your supplies together, let’s get started. The first thing you need to do is measure out your paper so you have enough to fit your frame.

20131229_133710

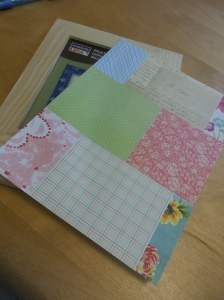
I did this by laying the paper over the frame and tracing the outline of the interior (where the picture goes) with a pencil. Looking back, I should have used an Exacto knife to cut with, but oh well. I ended up getting a more patchwork like finish to my frame, which, in this particular case, worked out nicely.

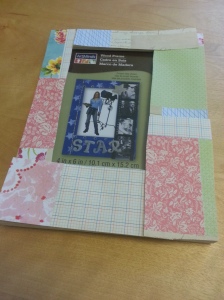
After you get the paper cut, lay it out on the frame to make sure it looks like you want it to before you start Mod Podging your little heart out. Always, always, always look at your project before you start gluing. You want to make sure it’s what you want.

20131229_134234

Doesn’t that look pretty? πŸ™‚

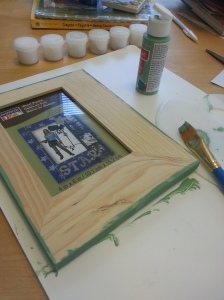
I wasn’t originally going to do any painting on the frame, but after getting my paper down, I thought the edges looked weird without any color to them, so I decided to go with this beautiful sage green color paint. I can’t remember the exact name of the color off the top of my head, though. If you want to know, leave me a message in the comments and I’ll get the information for you.

20131229_141024

If you are going to paint the frame, do so before Mod Podging the paper to it. You don’t want to get paint on your awesome paper! Paint the frame, and let it dry. If you do just the edges, like I did, it shouldn’t take long to dry at all. Maybe 20-30 minutes at the absolute most. I think I let mine dry for about 20 minutes just to be sure that it was completely dry.

20131231_101218

Now it’s time to finish! Lay your paper back on your frame, double checking to make sure everything is like you want it. Then start Mod Podging your little heart out! To be sure that the paper will stay, apply the Mod Podge to the frame and/or back of the paper first, lay the paper down on the frame, then apply the Mod Podge to the top. This ensures that the paper will stay on the frame, and it seals it so nothing happens to the paper. You don’t want all this hard work on your beautiful frame to be for nothing, do you?

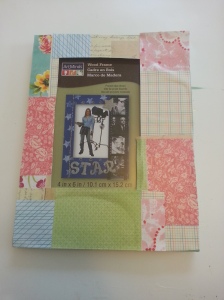
Once you’ve Mod Podged, and it’s dry, you have a beautiful new, one-of-a-kind frame ready for use!

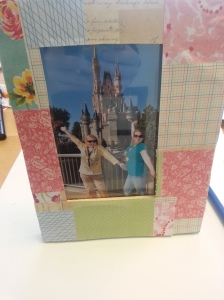
20131231_101727

Just add a picture, find a home for it, and there ya go! A new addition to your home that didn’t cost you a lot of money! πŸ™‚

I would love to see pictures of the frames you lovlies decide to make. Leave them in the comments, or post them on Twitter or Instagram and tag me! And if you post on Instagram, use #saagp to let people know you got your inspiration from here! πŸ™‚ I can’t wait to see what y’all come up with!

Stay warm!

Your Georgia Peach

-Amanda

Picture Frame Tutorial Coming!

I know I said that the next post I did after posting about my adorable picture frame would be the tutorial……but it obviously hasn’t been. I’ve gotten busy, and sick (again…..stupid Georgia weather), so I haven’t been able to sit down and write it. However, I promise that it will get done either tonight or tomorrow morning. I’m honestly not putting a lot of hope into getting it done tonight because I get home from work at around 6:30, and I have dinner to cook, a house to clean, and a football game to watch (GO FSU!!!). If it doesn’t get done tonight, I promise the tutorial will be the first thing I do when I get up in the morning.

And I can say that because my school system is awesome and obviously hates the cold as much as I do, because they canceled classes until Wednesday! πŸ™‚ This works out well for me because at 7am tomorrow morning, it’s supposed to be 9 (yes, single digits) degrees outside, and I refuse to leave my house in that mess. :p I’m a Southern girl…..I am not made to handle this ridiculous cold.Β 

Stay warm, my dears! I know pretty much everyone is going through this craziness with winter right now.Β 

Your Georgia Peach,

-Amanda

Goals for 2014

My YearWell hello there! πŸ™‚ I know it’s been a couple of days, but I’ve been busy! And even though I know I’m about to get even busier (school starts back next week…..time to get back in teacher mode!), I’m going to try to be more regular about posting. That’s one of my goals for this year. In fact, let’s take a minute to discuss what my goals for this year are–both in regards to my blog/business (my professional goals) and my personal goals.

Let’s start with the professional goals first.

1. Post blog posts regularly–I’m going to shoot for twice a week right now, until I get myself back in the groove of teaching and working at the library. Hopefully I’ll be able to up the posts to three or four times a week.

2. Set my goals for my business. Right now, I have two of them. The first is to actually open up shop, and I have that tentatively set for no later than March. Once I get going on projects, I’ll have a better idea of a more concrete date. The second is sell enough product this year to be able to pay off my credit card debt. Small (relatively, anyway) goal, but I have to start somewhere. Once I get that debt paid off, I’ll be able to set bigger, slightly more challenging goals. I want this business to be able to provide me with some financial stability, and getting that debt paid off will be a big help in that aspect.

3. Build my brand! If you haven’t already, follow me on Twitter, Pinterest, and Instagram (links are to your left). I’m excited to say that I already have followers on each platform, and I love waking up every morning and seeing more! It motivates me to keep going with this adventure.

4. Organize my craft room so that I can use it to create my products and manage my business. I think that one is self explanatory. I have major ideas for that room….I just need to implement them.

5. Get into the craft fair circuit for the fall. My dad used to own a business, and for 12 years, I spent almost every weekend working a craft show somewhere in the state of Georgia. So I definitely know what to expect with them, and what I need to do to prepare for one. If I do get in the fall circuit, I won’t drive myself too crazy by trying to do a show every weekend (I am a teacher after all, I have to have time for my teacher duties), but I’ll try and do one or two a month. And if I can do that, that means I’m getting successful enough to be able to quit my job at the library…..which brings me to my last professional goal for 2014….

6. Quit my job at the library! πŸ™‚

Now, for the personal goals.

1. Organize my house. And keep it clean and organized. If you know me, then you know how that doesn’t happen. Ever. At all. I’m extremely busy and just don’t have a lot of time to devote to cleaning and organizing my house. And it sucks because I’m getting to the point where I want to keep my house looking nice. So, I’m going to make it a goal of mine to be better at doing so.

2. Learn time management skills. They’re definitely needed at this point in my life.

3. Cook more, eat out less. Self explanatory.

4. Save money and pay off my debts. Mainly just credit card debt, but still. It needs to be paid off.

5. Lose weight. I joined Weight Watchers (again), because it works. The last time I was on it, I lost 17 pounds in about 7 months. I need to get back into the habit of eating healthier and doing some form of exercise.

6. Volunteer places. I always say I’m going to do this, but I never do. So this year, I will make it happen. πŸ™‚

And last, but not least…..

7. Meet new people–and not on a dating site. While I love guys and all, I need to meet some people who I’m not interested in dating….just make new friends. Most of my close friends live out of state, and I want to change that.

So there you have it: my goals for 2014. I have very high hopes for this year, and I can’t wait to see where it takes me. And I definitely can’t wait to start completing these goals and crossing them off my list! πŸ™‚ Leave me a comment and tell me some of your goals for this year, whether they be professional, personal, or both.

Your Georgia Peach,
-Amanda

Looking Forward to 2014!

So, it’s December 31, 2013…..the last day of a year that’s been interesting, to say the least. Lots of things have happened to me this year, both good and bad. But all have helped motivate me to have a stellar 2014. And I’m not going to let anything stop me from that! πŸ™‚

So, what plans do I have, you ask? Well, several of them are personal: ways for me to better myself in certain areas. However, my biggest plan is to do something I’ve wanted to do for awhile, and that’s start my own business. I love to craft, and I especially love to make home decor items. I’m getting more and more into decorating my own house and letting my personality come through with that, and I want to share this love with as many people as I can. I know this is something that is going to take time, but I’m willing andΒ Β able to put in the time needed. The more research I do on every aspect of running a business, the more excited I get. And the more research I do on different things to make, the more excited I get. This is going to be a big venture for me, and I can’t wait to see where it goes. πŸ™‚

So, here’s my last craft for 2013/an idea of what you can expect from me in 2014.

First Picture Frame

It’s a picture frame! I’ll give a more thorough tutorial in my next blog post, but essentially this is a wooden picture frame with scrapbooking paper mod podged to it. The picture in the frame is of my mom (in the yellow) and me at Disney World back in 2010. It’s one of my favorite pictures of us, and I thought it looked good in the frame. Plus, it’s been in a photo album since 2010….time for this picture to be displayed! πŸ™‚

2014 is going to be an amazing year……I can feel it. And I can’t wait to get it started! πŸ™‚

Your Georgia Peach,

-Amanda